Battery switch on travel trailer function is crucial for managing your RV’s power. Understanding how this simple switch works can prevent costly battery drain, protect your sensitive electronics, and keep your adventures running smoothly. This guide breaks down everything you need to know about travel trailer battery switches, from the different types available to troubleshooting common issues. We’ll cover the basics, delve into the technical aspects, and offer practical tips for maintenance and safe operation.
We’ll explore various switch types, their pros and cons, and how they control power flow between your house batteries and chassis battery. We’ll also walk you through wiring diagrams, safe connection procedures, and troubleshooting steps for common problems. By the end, you’ll be confident in understanding and maintaining your travel trailer’s battery system.
Battery Switch Types in Travel Trailers
Choosing the right battery switch for your travel trailer is crucial for managing your power sources effectively and preventing electrical issues. Understanding the different types available will help you make an informed decision based on your specific needs and setup. This section details the common types, their pros and cons, and helps you decide which is best for your RV.
Battery Switch Types and Their Characteristics
Travel trailers typically use one of several types of battery switches to control the flow of power from your batteries to the trailer’s electrical system. These switches allow you to isolate batteries, preventing accidental discharge, and select which batteries power your appliances. The most common types include single-pole, double-pole, and double-pole double-throw switches.
Single-Pole Battery Switches
A single-pole battery switch controls the power from a single battery source. It’s a simple on/off switch, ideal for trailers with only one battery. It’s relatively inexpensive and easy to install. However, it lacks the flexibility of more advanced switch types.
So, you’re wondering about that battery switch in your travel trailer? It’s super important! Basically, it controls the power flow from your trailer’s battery to your appliances. Check out this guide on the battery switch on travel trailer function for a better understanding. Knowing how to use it properly will save you headaches (and potentially a dead battery!).
Understanding this is key for maximizing your off-grid adventures. For even more in-depth info, especially if you’re into glamping, this other resource on battery switch on travel trailer function might be helpful. It’s all about keeping the lights on, right?
Double-Pole Battery Switches
A double-pole battery switch controls power from two separate batteries. This allows you to switch between batteries, or run both simultaneously, useful for larger trailers or those with house and starting batteries. This provides more control over your power sources than a single-pole switch.
Double-Pole Double-Throw (DPDT) Battery Switches
A DPDT switch offers the most control. It allows you to select between two batteries, run both in parallel (combined power), or disconnect both completely. This is the most versatile option but also the most complex to install and potentially the most expensive. It’s the best choice for managing multiple battery banks or for situations requiring precise control over power distribution.
Comparison of Battery Switch Types
| Type | Description | Advantages | Disadvantages |
|---|---|---|---|
| Single-Pole | Controls power from one battery. | Simple, inexpensive, easy to install. | Limited functionality; only suitable for single-battery systems. |
| Double-Pole | Controls power from two batteries independently or together. | More control than single-pole; allows switching between batteries or combining their power. | More complex than single-pole; may be more expensive. |
| Double-Pole Double-Throw (DPDT) | Allows selection between two batteries, parallel operation, or complete disconnection. | Most versatile; offers maximum control over power sources. | Most complex and expensive to install; requires more advanced electrical knowledge. |
Function and Purpose of the Battery Switch: Battery Switch On Travel Trailer Function
The battery switch in your travel trailer is a crucial component of its electrical system, acting as a central control for managing power flow and protecting your valuable equipment. It’s essentially a gatekeeper, determining which batteries are connected to the trailer’s electrical system at any given time. Understanding its function is key to preventing problems and ensuring the longevity of your batteries and electronics.The battery switch primarily manages the power flow between your travel trailer’s house batteries (used to power appliances inside the trailer) and the chassis battery (which powers the trailer’s lights, brakes, and other essential functions).
Depending on the type of switch (which we covered previously), this can involve simple on/off functionality for each battery bank or more complex configurations allowing for combining or isolating the batteries. This control is essential for conserving battery power and preventing accidental drain.
Battery Switch and Power Management
The switch’s ability to isolate batteries is critical for preventing parasitic drain. Parasitic drain occurs when small amounts of current continuously flow from your batteries even when your trailer isn’t in use. This slow drain can eventually discharge your batteries completely, leaving you stranded without power. By turning off the house batteries when the trailer is not in use, the battery switch prevents this drain, ensuring your batteries remain charged for your next adventure.
Imagine leaving a small light on inside your trailer for a week – the battery switch prevents this scenario from silently draining your house batteries.
Battery Switch and Electronic Protection
A properly functioning battery switch also offers a degree of protection for sensitive electronics within your travel trailer. By isolating the house batteries, you reduce the risk of power surges or voltage fluctuations that can damage these devices. For example, if a problem occurs with the charging system, the battery switch allows you to disconnect the house batteries, preventing any potential damage caused by incorrect voltage levels or overcharging.
This protective function helps ensure the longevity and proper operation of your appliances and other sensitive equipment.
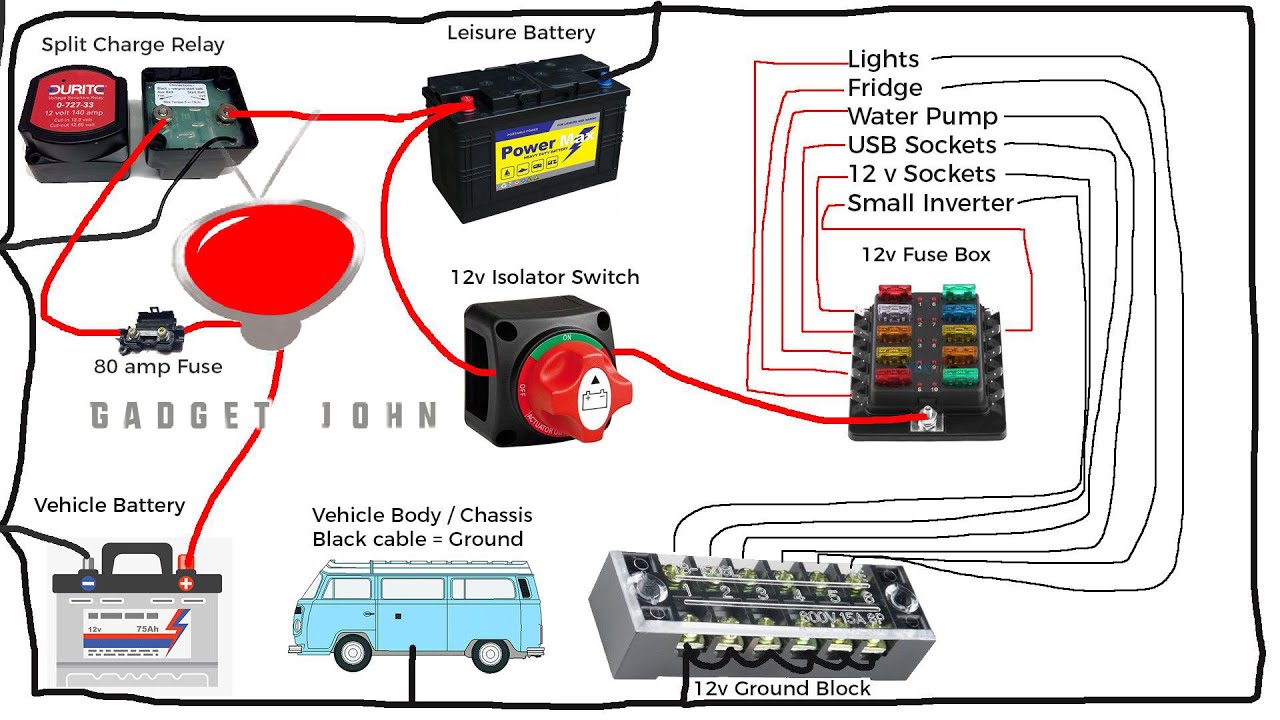
Wiring and Connections of the Battery Switch
Connecting your travel trailer’s battery switch correctly is crucial for safe and reliable power management. A properly wired system ensures your batteries are charged correctly, your appliances function as expected, and you avoid potentially dangerous electrical issues. This section details the typical wiring, safe connection procedures, and troubleshooting steps.
A typical travel trailer battery switch setup involves connecting the switch between the batteries and the trailer’s electrical system. This allows you to isolate the batteries from the rest of the trailer’s circuitry, preventing accidental drain and providing a convenient on/off switch for the entire system. The exact wiring configuration might vary slightly depending on the specific switch and trailer setup, but the fundamental principles remain consistent.
Typical Wiring Diagram
Imagine a diagram showing two batteries (Battery 1 and Battery 2), connected in parallel (positive terminals connected together, and negative terminals connected together). A large positive cable runs from the positive battery terminal connection to the “Battery” input terminal on the battery switch. Similarly, a large negative cable runs from the negative battery terminal connection to the “Battery” negative terminal on the battery switch.
From the “Load” terminals of the switch, two cables extend: a positive cable to the positive bus bar of the trailer’s electrical system and a negative cable to the negative bus bar. The positive bus bar distributes power to all positive components (lights, appliances, etc.), while the negative bus bar serves as the return path for the current.
Color-coding isn’t standardized across manufacturers, but positive cables are often red, and negative cables are often black. Some systems might also include a separate wire from the battery to a charging system (like a solar panel or converter), which would connect directly to the batteries, bypassing the battery switch. This ensures that the charging system can always charge the batteries, regardless of the switch’s position.
Safe Connection and Disconnection Procedures
Before working with any electrical connections, always disconnect the negative terminal from the battery. This is a critical safety precaution that minimizes the risk of accidental shorts and shocks.
- Disconnect the negative battery cable from the battery.
- Carefully remove any existing wires from the battery switch terminals.
- Connect the new wires, ensuring a secure and tight connection. Use appropriate sized ring terminals for a reliable connection.
- Reconnect the negative battery cable last.
- Test the system by turning the switch on and checking that all appliances are working correctly.
When disconnecting the battery switch for maintenance, follow the same safety procedure: disconnect the negative cable first, then disconnect the switch. Always double-check your connections before reconnecting the battery and powering the system back up.
Troubleshooting Common Wiring Problems
Troubleshooting battery switch issues often involves systematically checking connections and components. A methodical approach can save time and frustration.
- No Power to the Trailer: Check the battery switch itself. Is it in the “ON” position? Check the fuses both in the switch and in the main distribution panel. Inspect all wiring connections for looseness, corrosion, or damage. Test the batteries’ voltage using a multimeter.
Low voltage indicates a charging problem or battery failure.
- Intermittent Power: Look for loose or corroded connections, especially at the battery terminals and the switch terminals. A faulty switch itself could also cause intermittent power. Test the switch’s functionality by temporarily bypassing it (after disconnecting the battery’s negative terminal) with jumper cables, directly connecting the batteries to the load. If power is restored, replace the switch.
- Blown Fuses: A blown fuse indicates a short circuit somewhere in the system. Carefully inspect all wiring for any exposed wires or damaged insulation. Check for any components that might be drawing excessive current.
Remember, always disconnect the negative battery cable before performing any troubleshooting or repairs.
Okay, so you’re dealing with your travel trailer’s battery, right? Knowing how to use that battery switch is key. Check out this helpful guide on the battery switch on travel trailer function to understand the basics. It’s super important to know how to properly disconnect your battery to prevent drain when you’re not using your trailer.
Then, for more advanced tips, especially if you’re glamping, head over to this other resource about the battery switch on travel trailer function – it’s got some great info on maximizing your battery life and preventing issues. Seriously, understanding this switch is crucial for a smooth trip!
Troubleshooting Common Battery Switch Issues

Battery switch problems in your travel trailer can leave you stranded without power. Understanding the common issues and how to troubleshoot them can save you time, frustration, and potentially a costly repair. This section Artikels the most frequent problems and provides step-by-step solutions to get you back on the road.
No Power from the Battery Switch
This is the most common issue. No power means your appliances and lights aren’t working, and it’s likely related to the switch itself, the wiring, or the batteries. Systematic troubleshooting is key.
- Check the Battery Switch Position: Ensure the switch is correctly set to the “on” position for either the house batteries or the combined house and chassis batteries. A simple oversight can be the culprit.
- Inspect the Switch for Damage: Look closely at the switch for any signs of physical damage, such as cracks, loose connections, or burn marks. A damaged switch will need replacement.
- Test the Battery Connection: Verify that the battery cables are securely connected to both the batteries and the switch. Loose or corroded connections are frequent causes of power loss. Clean any corrosion with a wire brush and baking soda.
- Check the Fuses and Breakers: Check the fuses and circuit breakers in your trailer’s electrical panel. A blown fuse or tripped breaker can interrupt power even if the switch is on. Replace blown fuses with the correct amperage.
- Test Battery Voltage: Use a multimeter to check the voltage of your batteries. Low voltage indicates a battery problem, not necessarily a switch issue. A fully charged 12V battery should read around 12.6V.
Intermittent Power from the Battery Switch
This problem is more challenging to diagnose as the power comes and goes unpredictably. It usually points to a loose or corroded connection somewhere in the system.
- Inspect All Wiring Connections: Carefully examine all wiring connections associated with the battery switch, including those at the batteries, the switch itself, and any junction boxes. Look for loose connections, corrosion, or damaged wires.
- Check for Loose or Damaged Switch Components: Internal components within the switch itself might be failing intermittently. This often requires professional inspection and potential replacement.
- Investigate Grounding Issues: A poor ground connection can cause intermittent power problems. Trace the ground wire from the battery switch to ensure it’s securely connected to a clean metal surface on the trailer’s frame.
Battery Switch Overheating
Overheating is a serious problem that can indicate a significant electrical fault. Never ignore an overheating battery switch.
- Check for High Current Draw: An unusually high current draw on the system can cause the switch to overheat. This might be due to a short circuit somewhere in the wiring or a faulty appliance drawing excessive power. This often requires a systematic check of all appliances and wiring.
- Inspect for Loose Connections: Loose connections create resistance and generate heat. Tighten all connections to ensure a good electrical contact.
- Verify Proper Switch Sizing: Make sure the battery switch is appropriately sized for the amperage of your system. An undersized switch will overheat under heavy loads.
- Replace the Switch: If the switch continues to overheat despite addressing other issues, it’s likely faulty and needs replacement. Never operate an overheating switch.
Upgrading or Replacing a Battery Switch
Upgrading or replacing your travel trailer’s battery switch is a relatively straightforward task that can significantly improve your RV’s electrical system reliability and safety. This process might be necessary due to age, wear, insufficient amperage for new equipment, or a desire for added features like a more robust switch or improved isolation capabilities. Choosing the right replacement and performing the installation correctly is key to avoiding future problems.Replacing your battery switch involves several considerations, primarily focusing on amperage and switch type.
Factors to Consider When Upgrading or Replacing a Battery Switch
The most critical factor is the amperage rating. Your new switch must handle the total amperage draw of all your 12V devices. Underestimating this could lead to overheating and potential fire hazards. Consult your trailer’s wiring diagram or calculate the total amperage draw of all your 12V appliances and accessories to determine the required amperage. You’ll want to choose a switch with a higher amperage rating than your calculated total to provide a safety margin.
Additionally, consider the type of switch. A simple on/off switch is the most basic, while more advanced switches offer features like multiple banks for separating house and starting batteries, or even remote control capabilities.
Step-by-Step Guide to Safely Replacing a Battery Switch
Before starting any electrical work, always disconnect the negative battery terminal to prevent accidental shorts.
- Disconnect the Battery: Remove the negative (-) cable from your battery. This is crucial for safety.
- Remove the Old Switch: Carefully remove the old battery switch from its mounting location. Take note of the wiring connections before disconnecting them. A digital camera photo can be invaluable here.
- Prepare the New Switch: Inspect the new switch and compare its wiring terminals to the old one. Ensure they match.
- Wire the New Switch: Connect the wires to the new switch according to your notes and the new switch’s instructions. Pay close attention to the positive (+) and negative (-) terminals. Double-check all connections for security and proper polarity.
- Mount the New Switch: Securely mount the new switch in its designated location.
- Reconnect the Battery: Reconnect the negative (-) battery cable. Test the switch functionality to verify correct operation.
- Test the System: Turn on various 12V devices to ensure they function correctly and the switch is controlling power as expected.
Comparison of Battery Switch Brands and Models, Battery switch on travel trailer function
Several reputable brands offer various battery switches for travel trailers. Choosing the right one depends on your specific needs and budget. The following table offers a comparison of some popular options (Note: Specifications can vary by model, always check the manufacturer’s specifications):
| Brand | Model | Amperage | Features |
|---|---|---|---|
| Blue Sea Systems | 7610 | 200A | Heavy-duty, multiple battery banks |
| Perko | 0094DP | 150A | Durable, simple on/off switch |
| AGS | Various Models | Varies | Wide range of options, including remote switches |
| Progressive Dynamics | PD9160C | 100A | Integrated with other power management systems |
Mastering your travel trailer’s battery switch is key to a worry-free RV experience. From understanding the different switch types and their functions to confidently troubleshooting issues, this guide equips you with the knowledge to keep your power flowing. Remember to prioritize safety, perform regular maintenance, and don’t hesitate to consult a professional if you encounter any significant problems.
Happy travels!
FAQ
What happens if my battery switch is left on?
Leaving your battery switch on can drain your house batteries, especially if you have devices drawing power even when the trailer isn’t plugged into shore power. This can lead to a dead battery and prevent starting your vehicle.
How often should I inspect my battery switch?
Inspect your battery switch at least once a month for corrosion, loose connections, or any signs of damage. More frequent checks are recommended if you use your RV frequently.
Can I replace my battery switch myself?
Replacing a battery switch is generally a manageable DIY project, but if you’re uncomfortable working with electricity, it’s best to consult a professional. Always disconnect the batteries before working on the switch.
What size battery switch do I need?
The appropriate amperage rating for your battery switch depends on the combined amperage draw of all your appliances and devices. Consult your RV’s electrical system documentation or a qualified electrician to determine the correct size.
